Follow Me On Social Media!


Latest Peruvian Chicken And Rice With Green Sauce Recipe – 10 Expert Secrets
Make the latest peruvian chicken and rice with green sauce recipe with this tested recipe. Step-by-step guide with pro tips for amazing results every time!
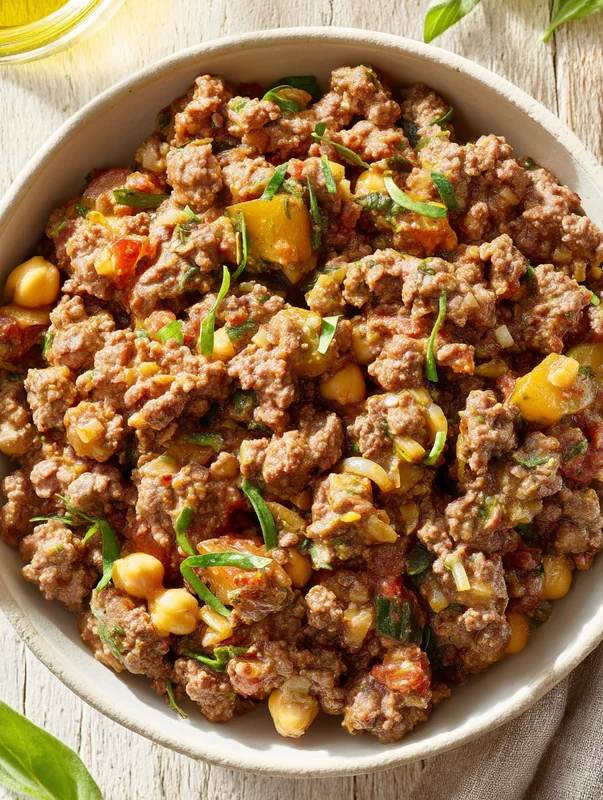
peruvian chicken and rice with green sauce recipe
📌 Key Takeaways
- 🍗 Juicy, Golden Brown Chicken: Marinated thighs deliver maximum flavor and stay incredibly tender throughout cooking
- 🌿 Authentic Ají Verde Sauce: The vibrant green sauce combines cilantro, jalapeño, and garlic for that signature Peruvian kick
- 🍚 Flavor-Infused Rice: Cooking rice in chicken broth instead of water creates restaurant-quality depth
- ⏱️ Ready in 60 Minutes: Just 30 minutes prep and 30 minutes cook time for this complete meal
- 🔥 Crispy Skin Secret: Pat dry technique plus high heat ensures that irresistible crispy skin texture
- 🌡️ Perfect Internal Temp: Pull chicken at 155°F for carryover cooking to reach safe 165°F final temperature
🎯 What Is Peruvian Chicken and Rice with Green Sauce?
Peruvian chicken and rice with green sauce is a flavorful main course featuring tender, seasoned chicken thighs served over aromatic rice and drizzled with ají verde, a vibrant cilantro-based sauce that defines Peruvian cuisine. This dish draws inspiration from Peru’s beloved pollo a la brasa tradition, where rotisserie chickens are served with addictively creamy green sauce that keeps diners coming back for more.
Unlike typical grilled chicken recipes, this Peruvian-inspired chicken dinner delivers layers of complexity. The fresh chicken absorbs a simple but effective marinade of olive oil, salt, and pepper, while the green sauce—made with cilantro, jalapeño, garlic, and green onions—provides brightness and heat that cuts through the richness of the protein.
What Makes This Recipe Special?
The magic of this poultry recipe lies in its balance. You get juicy, golden brown chicken with crispy skin, perfectly cooked rice infused with savory chicken broth, and that unmistakable ají verde that transforms the entire plate. It’s comfort food elevated to something extraordinary.
Whether you’re familiar with Peruvian cuisine or discovering it for the first time, this recipe adapts beautifully to home kitchens. You don’t need a rotisserie or specialized equipment—just basic pantry ingredients and about an hour of your time to create a restaurant-worthy main course that feeds the whole family.
🇵🇪 What Is Ají Verde (Peruvian Green Sauce)?
Ají verde is Peru’s iconic green sauce made by blending fresh cilantro, spicy peppers (traditionally ají amarillo), garlic, and a creamy base. The sauce is mildly spicy, herbaceous, and tangy—designed to complement grilled meats without overwhelming them. In authentic versions, huacatay (Peruvian black mint) and queso fresco add distinctive flavors, but this recipe uses accessible ingredients that capture the essential character of the sauce.
🔬 The Science Behind Perfect Peruvian Chicken
Understanding why certain techniques work transforms you from recipe-follower to confident cook. Let’s break down the food science that makes this Peruvian chicken and rice with green sauce recipe exceptional, drawing from principles championed by Serious Eats’ Food Lab.
Dry Brining vs. Wet Marinating: The 1-Hour to 24-Hour Timeline
When you salt chicken and let it rest, something remarkable happens. Initially, the salt draws moisture to the surface through osmosis. But given time—at least 30 minutes, ideally up to 24 hours—that moisture gets reabsorbed along with the salt, seasoning the meat deeply and changing its protein structure.
Here’s the critical difference in timing:
- 30 minutes to 1 hour: Surface-level seasoning; salt hasn’t fully penetrated but improves skin browning
- 4-6 hours: Salt penetrates approximately 1/4 inch into the meat—the maximum depth marinade can realistically reach
- 12-24 hours: Optimal results; proteins denature slightly, leading to more tender, juicy meat that holds onto moisture during cooking
The science is clear: marinade penetration maxes out at about 1/4 inch regardless of time. However, the longer salt contact allows for better moisture retention through protein restructuring—which is why overnight marinating produces noticeably more tender results.
Carryover Cooking: Why You Pull Chicken at 155°F
One of the most common mistakes home cooks make is cooking chicken until the thermometer reads 165°F—then wondering why the meat is dry. The solution lies in understanding carryover cooking.
When you remove chicken from heat, residual thermal energy continues cooking the meat. For chicken thighs, this typically means a 5-10°F temperature rise after resting. The formula is simple:
🌡️ Temperature Rule: Pull chicken thighs at 155-158°F internal temperature. After 5-10 minutes of resting, they’ll reach the safe 165°F while remaining incredibly juicy.
The Crispy Skin Secret: Pat Dry + High Heat
Moisture is the enemy of crispy skin. When chicken skin is wet, the heat energy goes toward evaporating that moisture rather than achieving the Maillard reaction—the chemical process that creates golden brown color and complex flavors.
For optimal crispy skin on your Peruvian chicken:
- Pat thoroughly dry with paper towels before marinating
- Let skin air-dry uncovered in the refrigerator for 1-4 hours (optional but effective)
- Start with high heat (400°F+ for oven, medium-high for pan) to rapidly render fat and crisp skin
- Optional pro technique: Dust skin lightly with baking powder (not baking soda)—it raises the pH, promoting faster browning
Internal Temperature Zones: Thigh vs. Breast
Chicken thighs are more forgiving than breasts because of their higher fat and connective tissue content. While breast meat becomes dry above 155°F, thigh meat actually benefits from reaching 175-185°F, which breaks down collagen into gelatin for a more tender texture.
This recipe specifically calls for thighs because:
- They stay moist even if slightly overcooked
- Higher fat content delivers more chicken flavor
- They’re more economical than breasts
- The dark meat pairs perfectly with the bold green sauce
How to Select the Best Chicken at the Store
Quality ingredients produce quality results. When shopping for fresh chicken thighs:
- Color: Look for pinkish flesh with no gray or green discoloration
- Smell: Fresh chicken should have minimal odor; avoid anything with a strong or sour smell
- Texture: Flesh should be firm and spring back when pressed, not slimy
- Packaging: Check for minimal liquid in the package (excessive liquid indicates freezer-burned or old product)
- Date: Choose packages with the furthest sell-by date for maximum freshness
- Air-chilled vs. water-chilled: Air-chilled chicken absorbs less water, leading to better browning and more concentrated chicken flavor

📝 Complete Ingredients List
This Peruvian chicken and rice with green sauce recipe uses simple, accessible ingredients that you can find at any grocery store. I’ve organized them by component to make your shopping and prep easier.
For the Marinated Chicken
- 4 chicken thighs (bone-in, skin-on for best flavor and texture)
- 1/4 cup olive oil (for marinade)
- Salt and pepper to taste (approximately 1 teaspoon salt, 1/2 teaspoon pepper)
For the Flavor-Infused Rice
- 2 cups long-grain white rice (jasmine or basmati work beautifully)
- 1 cup chicken broth (low-sodium preferred; you’ll add more liquid as needed)
For the Ají Verde (Green Sauce)
- 1/2 cup fresh cilantro (packed; include tender stems for extra flavor)
- 1/4 cup green onions (roughly chopped, white and light green parts)
- 2 cloves garlic (peeled)
- 1 jalapeño pepper (seeded for mild heat, or keep seeds for spicier sauce)
- 1/4 cup olive oil (for sauce emulsification)
🛒 Ingredient Quality Tips
For the best results, use fresh chicken rather than previously frozen, and choose cilantro with bright green leaves and no yellowing. The green onions should be firm with crisp white bulbs. These details may seem minor, but they significantly impact the final flavor of your seasoned chicken and sauce.
Looking for more delicious ways to use chicken? Try this Delighted Trader Joes Chicken Shawarma With Lemon Rice Recipe for another quick and flavorful weeknight dinner, or explore these Professional Savory Baked Cheese And Garlic Chicken Wraps that come together in just 15 minutes of prep.
Peruvian Pantry Swaps and Substitution Table
Want to make this recipe more authentic? Here’s a substitution table for traditional Peruvian ingredients and their accessible alternatives:
| Traditional Ingredient | Substitute | Notes |
|---|---|---|
| Ají amarillo paste | Jalapeño + pinch of turmeric | Adds similar heat with golden color |
| Huacatay (Peruvian black mint) | Fresh mint + basil (equal parts) | Approximates the unique herby flavor |
| Queso fresco | Feta cheese or cotija | Adds tanginess to the sauce |
| Ají verde with mayo | Greek yogurt or sour cream | Creates creamy texture; yogurt is lighter |
| Cancha (toasted corn) | Corn nuts | Traditional crunchy side dish |
For sourcing authentic ají amarillo paste, check the international aisle of large grocery stores, Latin markets, or order online. It keeps refrigerated for months and transforms not just this recipe but countless Peruvian dishes.
👨🍳 Step-by-Step Instructions
Follow these detailed instructions for perfectly executed Peruvian chicken and rice with green sauce. I’ve included timing markers and pro tips to ensure your chicken, rice, and sauce all finish together.
⏱️ Timing Workflow Overview
0:00 – Start marinating chicken
0:30 – Begin cooking rice; make green sauce
0:35 – Start cooking chicken
0:55 – Rest chicken; fluff rice
1:00 – Plate and serve
Step 1: Prepare and Marinate the Chicken (5 minutes active, 30 minutes resting)
Pro Tip: For the crispiest skin, pat your chicken thighs completely dry with paper towels before seasoning.
- Remove chicken thighs from packaging and pat thoroughly dry on all sides
- Place thighs in a large bowl or resealable bag
- Drizzle with 1/4 cup olive oil, ensuring all surfaces are coated
- Season generously with salt and pepper on both sides
- Massage the seasoning into the meat
- Cover and refrigerate for at least 30 minutes (up to 24 hours for best results)
Why This Works: The oil helps the seasonings adhere and promotes even browning. The resting time allows salt to penetrate the meat, improving both flavor and moisture retention during cooking.

Step 2: Cook the Flavor-Infused Rice (20-25 minutes)
Pro Tip: Rinsing rice removes excess starch for fluffier, less sticky results.
- Rinse 2 cups of rice under cold water until water runs clear (about 30 seconds)
- In a medium pot, combine rinsed rice with chicken broth and additional water as needed (check your rice package for liquid ratios—typically 1.5 to 2 cups liquid per cup of rice)
- Bring to a boil over high heat
- Reduce heat to low, cover tightly, and simmer for 18-20 minutes
- Remove from heat and let stand, covered, for 5 minutes
- Fluff with a fork before serving
Troubleshooting Rice:
- Rice is crunchy: Add 2-3 tablespoons water, cover, and cook 5 more minutes on lowest heat
- Rice is mushy: Spread on a baking sheet and let cool; next time reduce liquid by 1/4 cup
- Rice sticks to pot: Let it rest off heat for 5 minutes before fluffing; the steam loosens stuck grains
Step 3: Make the Ají Verde (Green Sauce) (5 minutes)
Pro Tip: Include cilantro stems—they contain more concentrated flavor than leaves and blend smoothly.
- Add 1/2 cup cilantro (leaves and tender stems) to a blender or food processor
- Add 1/4 cup chopped green onions
- Add 2 cloves garlic, peeled
- Add 1 jalapeño, seeded (or with seeds for more heat)
- Pour in 1/4 cup olive oil
- Blend on high for 30-60 seconds until completely smooth
- Taste and adjust salt as needed
- If sauce is too thick, add 1-2 tablespoons water and blend again
🔥 Heat Control Guide
- Mild: Remove all jalapeño seeds and white membrane
- Medium: Keep half the seeds
- Hot: Keep all seeds and add a second jalapeño
- Extra Hot: Substitute serrano pepper for jalapeño
Step 4: Cook the Chicken to Golden Brown Perfection (15-20 minutes)
Pro Tip: Don’t move the chicken once it hits the pan—let it develop an undisturbed golden crust.
For Pan-Frying (Recommended for Crispiest Skin):
- Heat a large cast-iron or heavy-bottomed skillet over medium-high heat
- Add 1 tablespoon oil (the chicken will release its own fat)
- Place chicken thighs skin-side down
- Cook without moving for 6-8 minutes until skin is deeply golden and crispy
- Flip and cook for another 6-8 minutes
- Check internal temperature—pull at 155°F (it will rise to 165°F while resting)
- Transfer to a cutting board and rest for 5-10 minutes
For Grilling:
- Preheat grill to medium-high (400-450°F)
- Oil grates well to prevent sticking
- Place chicken skin-side down and grill for 5-6 minutes
- Flip and continue grilling for 7-10 minutes until internal temp reaches 155°F
- Rest before serving
For Oven Roasting:
- Preheat oven to 425°F
- Place marinated thighs on a wire rack set over a baking sheet
- Roast for 35-45 minutes until skin is crispy and internal temp reaches 155°F
- Rest before serving
Step 5: Plate and Serve (2 minutes)
- Mound fluffy rice in the center of each plate
- Place one or two golden brown chicken thighs alongside or on top of rice
- Drizzle generously with ají verde green sauce
- Serve additional sauce on the side for dipping

Peruvian Chicken And Rice With Green Sauce Recipe
- Total Time: 60 minutesutes
- Yield: 1 1x
Description
A flavorful Peruvian dish featuring tender chicken served over rice, accompanied by a vibrant green sauce.
Ingredients
Scale
4 chicken thighs
2 cups of rice
1 cup of chicken broth
1/2 cup of cilantro
1/4 cup of green onions
2 cloves of garlic
1 jalapeño pepper
1/4 cup of olive oil
Salt and pepper to taste
Instructions
Marinate the chicken thighs with salt, pepper, and olive oil for at least 30 minutes.
In a pot, cook the rice according to package instructions using chicken broth instead of water.
In a blender, combine cilantro, green onions, garlic, jalapeño, and olive oil to make the green sauce.
Grill or pan-fry the marinated chicken until fully cooked.
Serve the chicken over the rice and drizzle with the green sauce.
Notes
Recipe tested and perfected for best results. Enjoy!
- Prep Time: 30 minutesutes
- Cook Time: 30 minutesutes
- Category: Main Course
- Method: Main Course
- Cuisine: Peruvian
⚡ Pro Tips & Common Mistakes to Avoid
After making this Peruvian chicken and rice with green sauce recipe countless times, I’ve identified the techniques that separate good results from exceptional ones. Master these tips and avoid these mistakes for restaurant-quality results every time.
Pro Tips for Perfect Results
🍗 For Juicier Chicken
- Bring chicken to room temperature 20 minutes before cooking
- Use an instant-read thermometer—don’t guess
- Rest meat for 5 minutes per pound before cutting
- Slice against the grain if serving off the bone
🔥 For Crispier Skin
- Pat skin completely dry—moisture creates steam, not crispness
- Start skin-side down in a cold pan, then turn on heat
- Press chicken gently with a spatula for maximum contact
- Optional: dust with 1/4 tsp baking powder before cooking
🌿 For Better Green Sauce
- Use fresh, vibrant cilantro—wilted herbs make bitter sauce
- Blend in stages: herbs first, then add oil slowly
- Add a squeeze of lime juice for brightness
- For creamier texture, add 2 tbsp mayonnaise or Greek yogurt
🍚 For Fluffier Rice
- Always rinse rice until water runs clear
- Don’t lift the lid while cooking
- Let rice rest 5 minutes after cooking before fluffing
- Fluff with a fork, never a spoon (which compacts grains)
Common Mistakes to Avoid
| Mistake | Why It Happens | How to Fix It |
|---|---|---|
| Rubbery, pale chicken skin | Starting with wet skin or too low heat | Pat dry, use medium-high heat, don’t move chicken |
| Dry, overcooked meat | Cooking to 165°F without accounting for carryover | Pull at 155°F and rest 5-10 minutes |
| Bitter green sauce | Using old cilantro or including tough stems | Use only fresh herbs and tender stems |
| Broken/oily green sauce | Adding oil too fast or over-blending | Drizzle oil slowly while blending; stop when smooth |
| Mushy or gummy rice | Too much liquid or not rinsing | Rinse rice; measure liquid precisely |
| Components finishing at different times | Not following proper timing workflow | Start chicken 5 min after rice; make sauce while both cook |
The Spatchcock Method: 40% Faster Cooking (Advanced Tip)
If you want to scale this recipe for a whole chicken, consider spatchcocking. This technique—removing the backbone and flattening the bird—reduces cooking time by approximately 40% while promoting more even cooking and crispier skin.
According to testing by America’s Test Kitchen, spatchcocked chicken cooks in about 45 minutes at 450°F compared to 75+ minutes for a traditional whole roasted bird. The flat shape means both breast and thigh meat cook at similar rates, eliminating the common problem of overcooked breast by the time thighs are done.
🔧 Equipment Needed
You don’t need specialized equipment for this Peruvian chicken and rice recipe—just standard kitchen tools that most home cooks already own.
Essential Equipment
- Large skillet or grill pan – Cast iron preferred for best heat retention and crispiest skin; 12-inch size ideal for 4 thighs
- Medium pot with lid – 2-3 quart capacity for rice; heavy bottom prevents scorching
- Blender or food processor – For smooth, emulsified green sauce; immersion blender works in a pinch
- Instant-read thermometer – Essential for food safety and perfect doneness; don’t rely on timing alone
- Cutting board – For resting chicken; use separate boards for raw and cooked poultry
- Sharp knife – For slicing and prep work
- Measuring cups and spoons – For accurate rice-to-liquid ratios
Optional But Helpful
- Wire cooling rack + sheet pan – For oven-roasting method; elevates chicken for all-around crispness
- Meat mallet – For pounding thighs to even thickness if needed
- Fine mesh strainer – For rinsing rice efficiently
- Citrus juicer – If adding lime juice to sauce
🔄 Variations & Substitutions
This versatile recipe adapts beautifully to different dietary needs, ingredient availability, and personal preferences. Here are tested variations that maintain the essential character of Peruvian chicken and rice with green sauce.
Choose Your Authenticity Level
🥉 Easy Pantry Version
Uses ingredients from any grocery store
- Jalapeño for heat
- Plain olive oil + garlic
- Regular white rice
- Basic cilantro sauce
Best for: Weeknight dinners, beginners
🥈 Closest-to-Peru Version
Incorporates authentic ingredients
- Ají amarillo paste for authentic heat
- Huacatay (or mint/basil blend)
- Queso fresco in sauce
- Mayonnaise-based ají verde
Best for: Food enthusiasts, special occasions
🥇 Restaurant-Style Version
Maximum flavor and presentation
- Rotisserie or oven char method
- Complex spice marinade (cumin, paprika, oregano)
- Two sauces (green + ají crema)
- Served with yuca fries + salad
Best for: Entertaining, weekend cooking
Dietary Variations
| Dietary Need | Modifications |
|---|---|
| Dairy-Free | Skip queso fresco; use olive oil or coconut cream in sauce instead of mayo/yogurt |
| Egg-Free Green Sauce | Use dairy-based mayo alternative or Greek yogurt (which is egg-free) for creaminess |
| Gluten-Free | Recipe is naturally gluten-free; verify chicken broth label for gluten-containing additives |
| Lower-Calorie | Use skinless thighs; reduce oil in marinade; substitute Greek yogurt for mayo in sauce |
| Lower-Sodium | Use low-sodium broth; reduce added salt; increase garlic and herbs for flavor |
| Keto/Low-Carb | Replace rice with cauliflower rice; increase green sauce portion |
Protein Alternatives
- Chicken breast: Cook to 155°F; slice thin against the grain to prevent dryness
- Whole chicken: Spatchcock and roast at 450°F for 45-55 minutes
- Bone-in leg quarters: Cook same as thighs; excellent budget option
- Turkey thighs: Larger portions; cook to same temperature as chicken
Love green sauce? You’ll also enjoy this Pioneering Green Chicken Tamales Recipe that features a similar vibrant, herbaceous flavor profile.
📦 Storage & Meal Prep Guide
This Peruvian chicken and rice with green sauce recipe is perfect for meal prep. Here’s everything you need to know about storing components, reheating properly, and scaling for larger batches.
Storage Guidelines
| Component | Refrigerator | Freezer | Best Container |
|---|---|---|---|
| Cooked chicken | 3-4 days | 2-3 months | Airtight container |
| Cooked rice | 4-6 days | 6 months | Shallow containers for quick cooling |
| Green sauce | 5-7 days | 3 months | Glass jar with tight lid; ice cube trays for freezing |
| Raw marinated chicken | 24 hours max | Not recommended | Resealable bag |
Food Safety Reminders
⚠️ Important Safety Guidelines
- Never marinate chicken longer than 24 hours – acid and salt begin breaking down meat texture
- Cool cooked rice within 1 hour – spread on a sheet pan for faster cooling; rice left at room temperature breeds bacteria
- Don’t cross-contaminate – use separate cutting boards and utensils for raw and cooked chicken
- Reheat to 165°F – especially important for chicken
Reheating Instructions
For Chicken:
- Oven (best): 350°F for 15-20 minutes; cover with foil to prevent drying
- Air fryer: 375°F for 5-8 minutes; recrisps skin beautifully
- Microwave (fastest): Cover and heat in 30-second intervals; add splash of broth to prevent drying
For Rice:
- Microwave: Add 1-2 tablespoons water per cup of rice; cover and heat 1-2 minutes
- Stovetop: Add splash of water/broth; heat covered over low until warmed through
For Green Sauce:
- Serve at room temperature or slightly chilled—don’t heat it
- Stir well before serving as oil may separate
Meal Prep Strategy
For Individual Portions (1 serving each):
- Portion 1 chicken thigh + 1/2 cup rice into each container
- Store green sauce separately to prevent sogginess
- Add sauce when ready to eat
For Family-Size (4 servings):
- Double all ingredients
- Use a larger skillet or cook chicken in batches
- Cook rice in a larger pot; increase liquid proportionally
For Party Platters (8+ servings):
- Consider roasting a whole spatchcocked chicken instead of thighs
- Make double or triple batch of green sauce
- Cook rice in a rice cooker or Instant Pot for hands-off prep
- Present family-style with sauce on the side
Make-Ahead Components
- Green sauce: Make up to 5 days ahead; flavors actually improve after 24 hours
- Marinated chicken: Prep the night before for deeper flavor penetration
- Rice: Best made fresh, but can be prepared 1-2 days ahead
📊 Nutrition Information & Portioning
Understanding the nutritional profile helps with meal planning and portion control. Here’s a breakdown for this Peruvian chicken and rice with green sauce recipe.
Nutrition Per Serving (1 plate: 1 chicken thigh + 1/2 cup cooked rice + 2 tablespoons sauce)
| Calories | ~520 kcal |
| Protein | 28g |
| Carbohydrates | 45g |
| Fat | 24g |
| Fiber | 1g |
| Sodium | ~580mg |
*Values are estimates based on standard ingredients and may vary depending on specific products used.
Scaling Guide
- For lighter portions: Serve 1 thigh with 1/3 cup rice (~400 calories)
- For larger appetites: Serve 2 thighs with 3/4 cup rice (~780 calories)
- For meal prep (5 days): Prepare 5 thighs, 2.5 cups uncooked rice, double the sauce
🍽️ Serving Suggestions & Traditional Accompaniments
While the chicken, rice, and green sauce create a complete meal, traditional Peruvian accompaniments elevate the dining experience. Here’s how to round out your plate.
Traditional Peruvian Sides
- Salad: Simple lettuce, tomato, and onion salad with lime dressing
- Crispy fries: Traditional pollo a la brasa always includes fries for dipping in green sauce
- Cancha (toasted corn): Crunchy corn kernels for textural contrast
- Pickled red onions: Tangy, bright pink onions that cut through richness
- Yuca fries: Starchy, crispy alternative to potato fries
Complementary Recipes
Round out your Peruvian-inspired menu with these related dishes:
- Add a fresh vegetable side with this Enormous Green Beans With Tahini Sbagliato Recipe
- For a different flavor profile, try this Promising Ravioli With Sun Dried Tomato Cream Sauce Recipe
Beverage Pairings
- Chicha morada: Traditional Peruvian purple corn drink (non-alcoholic)
- Inca Kola: Peru’s iconic golden-colored soda
- Sparkling water with lime: Cleanses palate between bites
- Lemonade: Refreshing complement to savory chicken
Condiment Ideas Beyond Green Sauce
- Ají crema: Creamy yellow pepper sauce
- Salsa criolla: Fresh onion, tomato, and lime salsa
- Hot sauce: For those wanting extra heat
- Lime wedges: Essential for squeezing over chicken and rice
❓ Frequently Asked Questions
Can I use chicken breast instead of thighs for this Peruvian chicken recipe?
Yes, you can use chicken breast, but thighs are strongly recommended. Breast meat is leaner and dries out faster—cook to 155°F internal temp and slice thin against the grain for best results. Thighs are more forgiving due to their higher fat content, which keeps the meat juicy and delivers more chicken flavor that pairs perfectly with the bold green sauce.
How do I make the green sauce less spicy?
To reduce heat in your ají verde, remove all seeds and white membrane from the jalapeño before blending. For an even milder sauce, use only half a jalapeño or substitute with a small amount of green bell pepper for color without heat. You can also increase the cilantro and oil proportions to dilute the spiciness while maintaining the vibrant green color.
Why is my green sauce bitter?
Bitter green sauce typically results from using wilted or old cilantro, including too many tough stems, or over-blending which releases bitter compounds. Always use fresh, vibrant cilantro with bright green leaves. Include only tender stems (the lower thick parts are bitter), and blend just until smooth—about 30-60 seconds. A splash of lime juice can also help balance any bitterness.
Can I make the green sauce ahead of time?
Absolutely! The green sauce actually improves after resting for 24 hours as the flavors meld together. Store in an airtight glass jar in the refrigerator for up to 5-7 days. A thin layer of olive oil on top helps preserve the bright green color. Stir well before serving as the oil may separate. You can also freeze the sauce in ice cube trays for up to 3 months.
What’s the difference between this recipe and authentic pollo a la brasa?
Traditional Peruvian pollo a la brasa uses a whole chicken cooked on a rotisserie with a complex spice marinade including cumin, paprika, oregano, and soy sauce. The sauce (ají verde) traditionally contains ají amarillo paste, huacatay (Peruvian black mint), and queso fresco. This recipe captures the essential flavors using accessible ingredients while simplifying the technique for home cooks without rotisserie equipment.
How do I get crispy chicken skin when pan-frying?
The key to crispy skin is moisture removal and proper heat. Pat chicken completely dry with paper towels before cooking. Start skin-side down in a hot pan and don’t move it for 6-8 minutes—this allows the fat to render and the skin to crisp without steaming. Optional: dust skin lightly with baking powder before cooking, which raises the pH and promotes faster browning.
Can I use a rice cooker or Instant Pot for the rice?
Yes! For a rice cooker, use the same liquid ratios (chicken broth instead of water) and follow your machine’s normal settings. For Instant Pot, use a 1:1 ratio of rice to liquid, cook on high pressure for 4 minutes, then natural release for 10 minutes. Both methods produce excellent results and free up stovetop space for cooking the chicken.
📚 Learn More About Cooking Science
Want to deepen your understanding of the techniques used in this recipe? These authoritative resources offer extensive insights into food science and tested recipes:
- Serious Eats – The Food Lab – Comprehensive food science explanations and tested techniques
- America’s Test Kitchen – Rigorous recipe testing and equipment reviews

About Chef Lucía Barrenechea Vidal
Chef Lucía brings over 15 years of culinary experience specializing in Latin American cuisine. Trained in traditional Peruvian cooking techniques and modern gastronomy, she is passionate about making authentic flavors accessible to home cooks. Her recipes combine time-honored methods with practical tips for today’s busy kitchens.
Expertise: Peruvian Cuisine, Latin American Cooking, Recipe Development