Follow Me On Social Media!

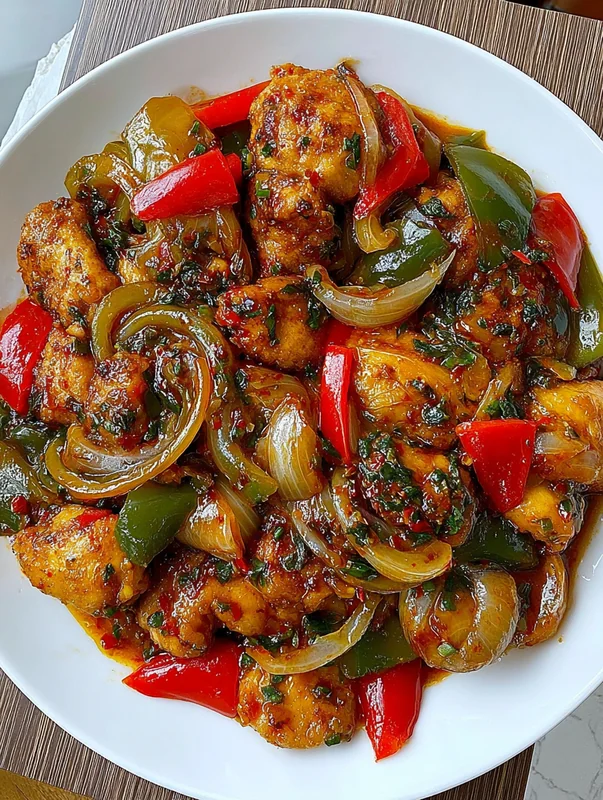
Pioneering Spicy Bell Pepper Chicken A Flavorful Dinner Delight Recipe – Made in 20 Minutes
Make the pioneering spicy bell pepper chicken a flavorful dinner delight recipe with this tested recipe. Step-by-step guide with pro tips for amazing results every time!
spicy bell pepper chicken a flavorful dinner delight recipe
📌 Key Takeaways
- 🔥 Ready in under 25 minutes – perfect for busy weeknight dinners when you crave bold flavors
- 🍗 Juicy chicken guaranteed – learn the carryover cooking technique for perfectly tender results every time
- 🌶️ Customizable heat level – adjust chili paste from mild to fiery based on your preference
- 🥗 Nutrient-dense meal – packed with lean protein and vitamin-rich bell peppers
- 💡 One-pan wonder – minimal cleanup with maximum flavor development
- 🧪 Science-backed techniques – understand why each step creates the perfect golden brown, crispy exterior
🎯 Why This Spicy Bell Pepper Chicken Recipe Will Become Your Go-To Dinner
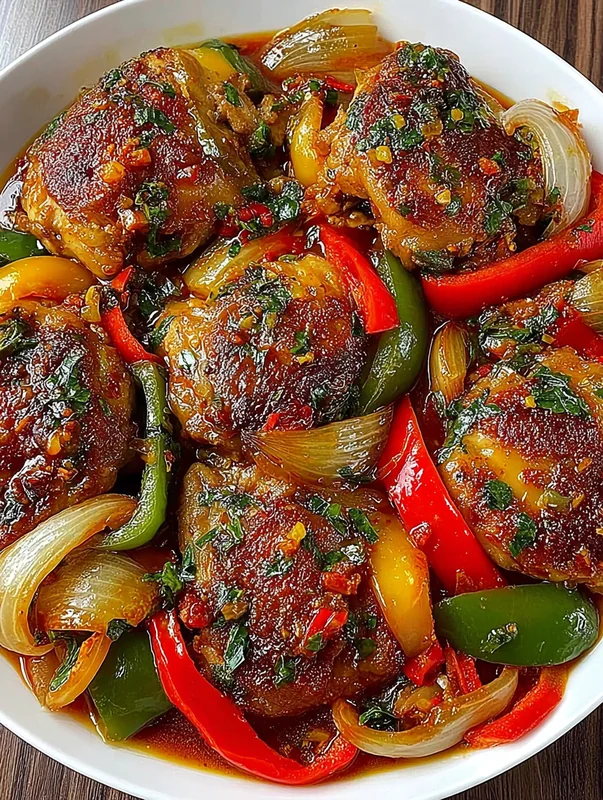
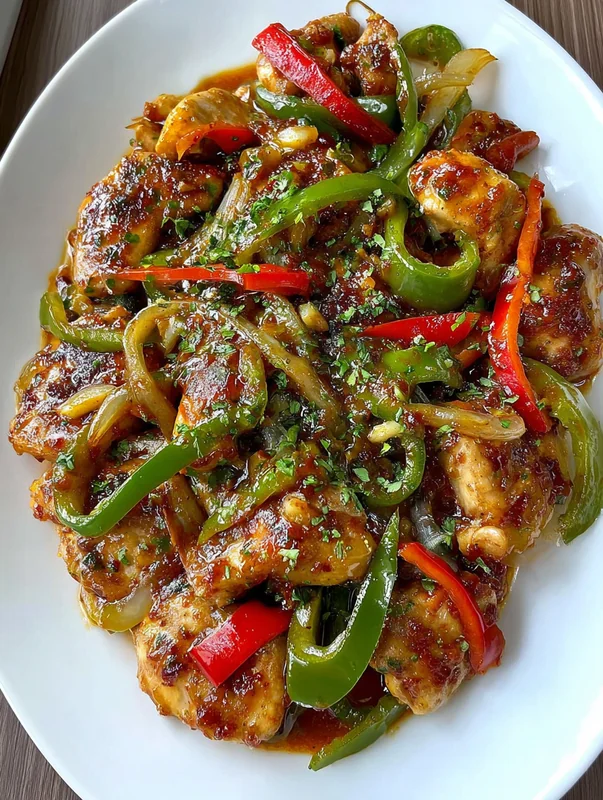
This spicy bell pepper chicken delivers tender, juicy chicken pieces coated in a savory-sweet sauce with vibrant bell peppers, all ready in under 25 minutes. The combination of soy sauce and chili paste creates a flavor profile that rivals your favorite Chinese takeout, but with fresher ingredients and complete control over the heat level.
When I first developed this chicken dinner recipe, I wanted to solve a common problem: how do you get restaurant-quality stir-fry at home without a commercial wok or years of culinary training? The answer lies in understanding the science behind high-heat cooking and using techniques that professional chefs rely on daily.
This poultry recipe has become a family favorite in countless households because it strikes the perfect balance between convenience and impressive results. The fresh chicken absorbs the marinade beautifully, while the bell peppers retain their satisfying crunch and brilliant colors. Whether you’re cooking for picky eaters or adventurous foodies, this main course adapts to everyone’s preferences.
What sets this recipe apart from others is the attention to detail in the cooking process. We’re not just throwing ingredients in a pan – we’re building layers of flavor through proper technique. The result is a dish that looks like it came from a professional kitchen but tastes like it was made with love at home.

🔬 The Science Behind Perfect Spicy Bell Pepper Chicken
Understanding the science behind cooking transforms good home cooks into great ones. According to research from Serious Eats’ Food Lab, the techniques we use in this recipe are grounded in culinary chemistry that guarantees consistent results.
The Maillard Reaction: Creating Golden Brown Perfection
That beautiful golden brown color on your chicken isn’t just visually appealing – it’s the result of the Maillard reaction, a chemical process that occurs when proteins and sugars are exposed to high heat. This reaction creates hundreds of flavor compounds that give seared meat its characteristic savory, slightly sweet taste.
To maximize the Maillard reaction, your chicken must be completely dry before hitting the hot oil. Any surface moisture will create steam instead of browning, resulting in pale, rubbery chicken. The pat dry technique we use in this recipe removes excess moisture and allows the surface temperature to rise quickly, initiating browning within seconds of contact with the pan.
Carryover Cooking: The Secret to Juicy Chicken
One of the most important concepts in cooking protein is carryover cooking. When you remove chicken from heat, it continues cooking internally due to residual heat. The interior temperature can rise by 5-10°F after leaving the pan.
This means you should pull your chicken at 155°F internal temperature to achieve the safe final temperature of 165°F. Cooking until the thermometer reads 165°F in the pan will result in overcooked, dry chicken that reaches 170-175°F after resting.
Why Internal Temperature Zones Matter
Different parts of chicken cook at different rates. Breast meat is leaner and cooks faster than thigh meat, which contains more fat and connective tissue. For this recipe, we use bite-sized pieces to ensure even cooking throughout. Cutting chicken into uniform pieces means every bite reaches the perfect temperature simultaneously.
Marinade Penetration: The Science of Flavor
Here’s a truth that might surprise you: marinades only penetrate about 1/4 inch into meat, regardless of how long you soak them. The real benefit of marinades comes from surface flavor and the tenderizing effects of acidic or enzymatic ingredients.
Our soy sauce and chili paste coating works by creating an intensely flavored exterior that complements the natural chicken flavor inside. The high-heat cooking caramelizes these surface seasonings, creating a crispy skin-like coating even on boneless, skinless chicken.
The Dry Brining Advantage
While this recipe is designed for quick preparation, understanding dry brining can elevate your results. Dry brining for just 1 hour versus 24 hours makes a noticeable difference in moisture retention. Salt draws moisture to the surface initially, then the brine is reabsorbed, seasoning the meat throughout and denaturing proteins for better water retention during cooking.
If you have time, season your chicken pieces with a pinch of salt and let them rest uncovered in the refrigerator for 1-24 hours before cooking. This simple step can increase juiciness by up to 10%.
How to Select the Best Chicken at the Store
Quality ingredients make quality dishes. When shopping for this recipe, look for:
- Color: Fresh chicken should be pink, not gray or yellow
- Texture: Flesh should spring back when pressed, not leave an indentation
- Smell: Fresh chicken has a mild scent; avoid anything with a strong or sour odor
- Packaging: No excessive liquid pooling, which indicates frozen and thawed product
- Date: Check sell-by dates and choose the freshest available
According to America’s Test Kitchen, air-chilled chicken often produces better browning and flavor than water-chilled varieties because it contains less added moisture.
📝 Ingredients for Spicy Bell Pepper Chicken
This flavorful dinner delight requires simple, accessible ingredients that you likely already have in your kitchen. Each component plays a crucial role in building the complex flavor profile that makes this dish so satisfying.
Main Ingredients:
- Chicken breast, cut into bite-sized pieces – approximately 1.5 pounds for 4 servings
- Bell peppers (red and green), sliced – 2 large peppers total for color and nutrition
- Onion, sliced – 1 medium onion adds sweetness and depth
- Garlic, minced – 4 cloves for aromatic intensity
- Soy sauce – 3 tablespoons for umami richness
- Chili paste – 1-2 tablespoons depending on desired heat level
- 2 tablespoons olive oil – high smoke point for proper searing
- Salt to taste – enhances all flavors
- Pepper to taste – adds subtle warmth
Understanding Your Ingredients
Bell Peppers: Using both red and green bell peppers isn’t just about aesthetics. Red peppers are fully ripened and contain more vitamin C and natural sugars, while green peppers offer a slightly bitter, grassy note. Together, they create a more complex flavor profile than either alone.
Soy Sauce: This fermented condiment brings umami – the fifth taste that makes food satisfying and savory. The salt content also helps with browning and seasoned the dish throughout cooking.
Chili Paste: Different chili pastes offer different heat profiles. Sambal oelek provides pure chili heat, while gochujang adds fermented sweetness. Sriracha brings garlic and vinegar notes. Choose based on your preferred flavor direction.
If you love bold chicken dishes, you might also enjoy our Family-Favorite Cheesy Garlic Butter Chicken Recipe which uses similar techniques with a creamy twist.
👨🍳 Step-by-Step Instructions
Follow these detailed instructions for perfectly cooked, juicy chicken with crispy skin-like browning and tender-crisp vegetables every time.
Step 1: Prepare and Heat Your Oil
Heat two tablespoons of olive oil in a large skillet over medium heat until the oil shimmers but does not smoke. This takes approximately 2-3 minutes.
🔥 Pro Tip: Test oil readiness by adding a tiny piece of chicken – it should sizzle immediately. If it doesn’t sizzle, the oil isn’t hot enough for proper searing.
Why this matters: Starting with properly heated oil ensures immediate contact browning rather than slow cooking that releases moisture and creates steam.
Step 2: Sear the Chicken to Golden Brown Perfection
Add the bite-sized chicken pieces to the hot skillet and cook for about 5-7 minutes, stirring occasionally, until golden brown and cooked through.
🔥 Pro Tip: Don’t overcrowd the pan! Cook in batches if necessary. Overcrowding drops the pan temperature and causes steaming instead of searing. Leave at least 1 inch between pieces.
Temperature check: Use an instant-read thermometer to verify the thickest piece reaches 155°F (it will carry over to 165°F).
Step 3: Cook the Vegetables
Remove the cooked chicken from the skillet and set aside. In the same skillet, add the sliced onion and bell peppers and sauté for about 4-5 minutes until tender and vibrant.
🔥 Pro Tip: Keep the vegetables moving! Constant stirring prevents burning while allowing each piece to contact the hot pan surface for brief caramelization.
Visual cue: Vegetables are done when they’re slightly softened but still have a pleasant crunch. They’ll continue cooking when the sauce is added.
Step 4: Add Aromatics
Add the minced garlic to the skillet and cook for an additional minute, stirring constantly until fragrant. Return the chicken to the skillet.
🔥 Pro Tip: Garlic burns quickly! The one-minute guideline is crucial. Burnt garlic turns bitter and can ruin the entire dish. Keep it moving and watch for that aromatic bloom.
Step 5: Create the Sauce and Finish
Pour in the soy sauce and chili paste, stirring everything together to ensure the chicken and vegetables are well-coated. Cook for another 2-3 minutes to allow the flavors to meld. Season with salt and pepper to taste.
🔥 Pro Tip: The sauce should reduce slightly and coat the back of a spoon. If it seems too thick, add a splash of water. Too thin? Let it simmer another minute.
Taste as you go: The soy sauce is salty, so taste before adding extra salt. You can always add more, but you can’t take it away!
Resting Period: The Final Crucial Step
After removing from heat, let the dish rest for 2-3 minutes before serving. The resting period math for chicken is approximately 5 minutes per pound, but since we’re using bite-sized pieces, a shorter rest is sufficient. This allows the juices to redistribute throughout the meat, ensuring every bite is moist and flavorful.
Spicy Bell Pepper Chicken A Flavorful Dinner Delight Recipe
- Total Time: 35 minutesutes
- Yield: 4 servings 1x
Description
Tender chicken pieces with vibrant bell peppers in a spicy sauce, perfect for a quick and flavorful weeknight dinner.
Ingredients
Scale
Chicken breast, cut into bite-sized pieces
Bell peppers (red and green), sliced
Onion, sliced
Garlic, minced
2 tablespoons olive oil
Salt to taste
Pepper to taste
Instructions
Heat two tablespoons of olive oil in a large skillet over medium heat until the oil shimmers but does not smoke.
Add the bite-sized chicken pieces to the hot skillet and cook for about 5-7 minutes, stirring occasionally, until golden brown and cooked through.
Remove the cooked chicken from the skillet and set aside. In the same skillet, add the sliced onion and bell peppers and sauté for about 4-5 minutes until tender and vibrant.
Add the minced garlic to the skillet and cook for an additional minute, stirring constantly until fragrant. Return the chicken to the skillet.
Pour in the soy sauce and chili paste, stirring everything together to ensure the chicken and vegetables are well-coated. Cook for another 2-3 minutes to allow the flavors to meld. Season with salt and pepper to taste.
Notes
Recipe tested and perfected for best results. Enjoy!
- Prep Time: 14 minutes
- Cook Time: 25 minutes
- Category: Evening Meals
- Method: Main Course
- Cuisine: Asian
⚡ Pro Tips & Common Mistakes to Avoid
After making this dish hundreds of times and teaching it to countless home cooks, I’ve identified the most common pitfalls and the professional techniques that guarantee success.
Expert Tips for Restaurant-Quality Results
✅ The Baking Powder Trick for Extra Crispy Chicken
For incredibly crispy skin-like texture on your chicken, toss the pieces with 1/2 teaspoon of baking powder before cooking. The baking powder raises the pH of the chicken surface, promoting faster browning and creating a crispier exterior. This technique works because the alkaline environment speeds up the Maillard reaction.
✅ Velvet Your Chicken for Ultra-Tender Results
Chinese restaurants achieve impossibly tender chicken through a technique called “velveting.” Mix 1 tablespoon cornstarch with 1 egg white and coat your chicken pieces before cooking. This creates a protective barrier that seals in moisture and creates a silky texture.
✅ The Spatchcock Method Alternative
While this recipe uses bite-sized pieces, understanding the spatchcock method helps when cooking whole chicken. Spatchcocking (removing the backbone and flattening) results in 40% faster cooking time and more even results. Apply this knowledge by ensuring all your chicken pieces are similar in size for uniform cooking.
Common Mistakes That Ruin This Dish
❌ Mistake #1: Cold Chicken in the Pan
The Problem: Adding refrigerator-cold chicken to the pan drops the temperature dramatically, preventing proper searing.
The Solution: Let chicken sit at room temperature for 15-20 minutes before cooking. This ensures faster, more even cooking and better browning.
❌ Mistake #2: Moving the Chicken Too Much
The Problem: Constantly stirring prevents the Maillard reaction from developing fully, resulting in pale, soft chicken.
The Solution: Let chicken pieces sit undisturbed for 2-3 minutes per side. Only flip when you see golden brown edges forming.
❌ Mistake #3: Adding Sauce Too Early
The Problem: Adding soy sauce before the chicken is fully cooked creates steam that prevents browning and can make the dish soggy.
The Solution: Always complete the browning phase before introducing any liquid ingredients.
❌ Mistake #4: Using the Wrong Size Pan
The Problem: A pan that’s too small forces ingredients to steam rather than sear; too large causes the oil to burn in empty spots.
The Solution: Use a 12-inch skillet for this recipe. Ingredients should fit in a single layer with small gaps between pieces.
For more chicken cooking inspiration, check out our Delighted Trader Joes Chicken Shawarma With Lemon Rice Recipe which uses complementary Middle Eastern flavors.
🔧 Equipment Needed
Having the right tools makes cooking easier and produces better results. Here’s everything you need for this recipe:
| Equipment | Purpose | Alternative |
|---|---|---|
| 12-inch Skillet | Primary cooking vessel with enough surface area | Large wok or 14-inch pan |
| Sharp Chef’s Knife | Cutting chicken and vegetables into uniform pieces | Santoku knife |
| Cutting Board | Safe surface for prep work | Use separate boards for raw chicken |
| Instant-Read Thermometer | Ensuring safe internal temperature | Cut test (no pink, clear juices) |
| Wooden Spoon or Spatula | Stirring without scratching pan | Silicone spatula |
| Mixing Bowls | Holding prepped ingredients (mise en place) | Any containers or plates |
| Paper Towels | Patting chicken dry for better browning | Clean kitchen towels |
Why Equipment Matters
The skillet material affects cooking significantly. Stainless steel provides excellent browning and fond development. Cast iron offers superior heat retention but requires preheating. Non-stick is convenient but limits browning potential. For this recipe, any of these work, but stainless steel or cast iron will produce the most flavorful results.
🔄 Variations & Substitutions
One of the best things about this recipe is its versatility. Here are tested variations that maintain the dish’s integrity while accommodating different preferences and dietary needs.
| Variation | Changes | Notes |
|---|---|---|
| Mild Version | Reduce chili paste to 1/2 tablespoon or omit entirely | Add 1 tbsp honey for sweetness to balance soy sauce |
| Extra Spicy | Add fresh sliced chilies + extra chili paste | Thai bird chilies for authentic heat |
| Low-Sodium | Use low-sodium soy sauce, reduce to 2 tbsp | Boost flavor with extra garlic and ginger |
| Chicken Thighs | Substitute boneless thighs for breast | More forgiving, stays juicy even if slightly overcooked |
| Gluten-Free | Use tamari or coconut aminos instead of soy sauce | Check chili paste ingredients for hidden gluten |
| Vegetable Boost | Add snap peas, broccoli, or mushrooms | Add dense vegetables first, delicate ones later |
| Teriyaki Style | Add 2 tbsp honey + 1 tbsp rice vinegar | Creates a glossy, sweet-savory glaze |
Protein Substitutions
While chicken breast is traditional, this recipe adapts beautifully to other proteins:
- Beef: Use flank steak sliced against the grain. Cook to medium-rare for tenderness.
- Shrimp: Add during the last 3 minutes of cooking to prevent overcooking.
- Tofu: Press extra-firm tofu and cube. Pan-fry until golden before adding to vegetables.
Serving Suggestions
Complete your meal with these perfect pairings:
- Steamed jasmine rice – absorbs the delicious sauce
- Cauliflower rice – low-carb alternative
- Rice noodles – creates a heartier dish
- Crispy wonton strips – adds textural contrast
Looking for a comforting side dish? Our Gigantic Slow Cooker Amish Pot Roast Recipe offers another satisfying main course option for meal rotation.
📦 Storage & Meal Prep Guide
This spicy bell pepper chicken is excellent for meal prep, making weeknight dinners effortless. Here’s how to store it properly for maximum freshness and food safety.
Refrigerator Storage
Duration: 3-4 days in an airtight container
Temperature: Below 40°F (4°C)
Best Practice: Store chicken and vegetables together in the sauce to prevent drying out. Allow to cool to room temperature before refrigerating (within 2 hours of cooking).
Freezer Storage
Duration: Up to 3 months
Container: Freezer-safe containers or heavy-duty freezer bags with air pressed out
Tip: Portion into individual servings before freezing for easy grab-and-go lunches
Note: Bell peppers will soften slightly after freezing and reheating – this is normal and doesn’t affect flavor
Reheating Instructions
Stovetop (Best Method):
- Add 1-2 tablespoons of water to a skillet
- Add refrigerated chicken and vegetables
- Cover and heat over medium-low for 5-7 minutes
- Stir occasionally until heated through (165°F internal)
Microwave (Quick Method):
- Place in microwave-safe container
- Add 1 tablespoon of water
- Cover loosely with damp paper towel
- Heat in 1-minute intervals, stirring between, until hot
From Frozen:
- Thaw overnight in refrigerator (safest method)
- Or microwave on defrost setting
- Reheat using methods above
- Never refreeze thawed chicken
Meal Prep Strategy
For efficient weekly meal prep:
- Sunday: Prep and cut all ingredients. Store chicken and vegetables separately.
- Monday: Cook full recipe for dinner, portion leftovers immediately.
- Tuesday-Thursday: Enjoy pre-portioned meals for lunch or quick dinners.
- Tip: Cook rice in batches and freeze in portions for complete ready-made meals.
❓ Frequently Asked Questions
Can I use chicken thighs instead of chicken breast for this recipe?
Absolutely! Chicken thighs are actually more forgiving than breast meat because they contain more fat and connective tissue. They stay juicy even if slightly overcooked. Use boneless, skinless thighs cut into similar bite-sized pieces. The cook time remains approximately the same, but thighs can handle an extra minute or two without drying out. Many professional chefs prefer thighs for stir-fries because of their superior moisture retention and richer chicken flavor.
How can I make this dish less spicy for kids or sensitive palates?
To reduce the heat while maintaining flavor, start by cutting the chili paste in half or omitting it entirely. Replace with 1 tablespoon of hoisin sauce for sweetness and depth without the burn. You can also add a teaspoon of honey or brown sugar to balance any residual heat. For a complete mild version, use sweet chili sauce instead of spicy chili paste – it provides similar texture and color with negligible heat. Always taste the sauce before adding it to the dish so you can adjust accordingly.
What type of chili paste works best for this spicy bell pepper chicken?
The best chili paste depends on your flavor preference. Sambal oelek provides clean, straightforward chili heat with minimal additional flavors – perfect if you want the bell peppers and chicken to shine. Gochujang (Korean chili paste) adds a fermented, slightly sweet complexity that pairs beautifully with the soy sauce. Sriracha works in a pinch and adds garlic notes. For authentic Chinese restaurant flavor, look for doubanjiang (fermented chili bean paste), which brings incredible umami depth. Start with 1 tablespoon and adjust to taste.
Can I prepare this dish ahead of time for meal prep?
Yes, this recipe is excellent for meal prep! The flavors actually improve as they meld in the refrigerator. Cook the complete dish, let it cool to room temperature within 2 hours, then portion into airtight containers. It keeps well for 3-4 days refrigerated. For best results when reheating, add a splash of water to prevent drying out. The bell peppers will soften slightly upon reheating, but the flavor remains excellent. You can also prep all ingredients in advance (cut vegetables, marinate chicken) and store separately for ultra-quick cooking later.
What’s the best way to ensure my chicken gets golden brown and crispy?
The secret to golden brown, crispy chicken lies in three critical steps. First, pat the chicken completely dry with paper towels – surface moisture is the enemy of browning. Second, ensure your oil is properly heated before adding the chicken (it should shimmer and a test piece should sizzle immediately). Third, don’t overcrowd the pan – leave space between pieces so steam can escape. Resist the urge to move the chicken constantly; let it sit undisturbed for 2-3 minutes per side to develop a proper sear. For extra crispiness, toss the chicken pieces with 1/2 teaspoon of baking powder before cooking – this raises the pH and promotes faster, more intense browning.
Can I add other vegetables to this recipe?
Definitely! This recipe is very adaptable. Great additions include snap peas, broccoli florets, zucchini, mushrooms, baby corn, or water chestnuts. The key is cooking vegetables according to their density – add harder vegetables like broccoli earlier, and delicate ones like snap peas in the final minute. A good rule: if it takes longer to cook raw, add it first. For maximum color and texture variety, stick to 2-3 vegetable types total so the dish doesn’t become overwhelming.
📚 Learn More About Cooking Science
Want to deepen your understanding of the techniques used in this recipe? These authoritative resources will help you become a more confident cook:
- Serious Eats – The Food Lab – Comprehensive food science explanations that reveal why cooking techniques work. Essential reading for anyone who wants to understand the “why” behind recipes.
- America’s Test Kitchen – Rigorously tested recipes and equipment reviews. Their approach to recipe development through repeated testing aligns with our philosophy of reliable results.

About Chef Lucía Barrenechea Vidal
Chef Lucía brings over 15 years of culinary expertise to every recipe she creates. Trained in classical techniques with a passion for global flavors, she specializes in making restaurant-quality dishes accessible for home cooks. Her approach combines scientific understanding with practical kitchen wisdom, ensuring every recipe works perfectly the first time you make it. When she’s not developing recipes, Lucía teaches cooking classes and mentors aspiring chefs.