Follow Me On Social Media!

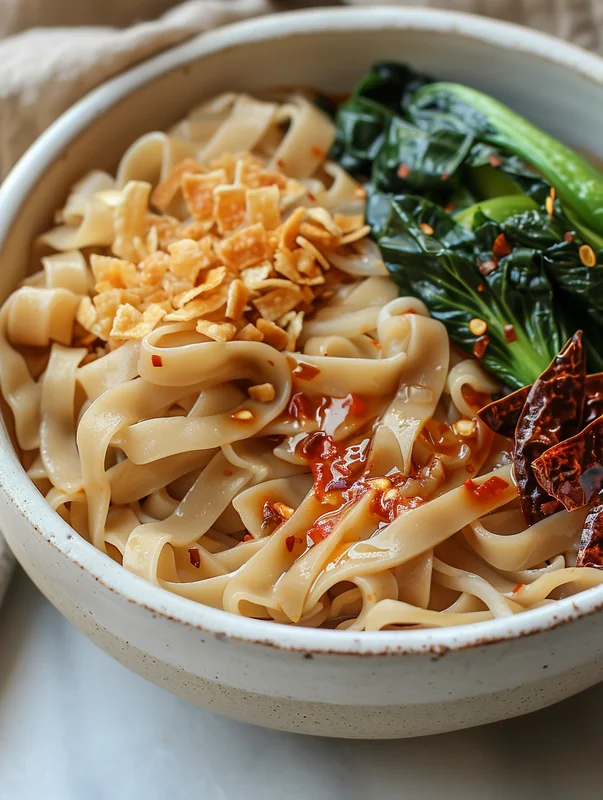
Restaurant-Quality Hand-Pulled Noodles Recipe
Make the restaurant-quality hand-pulled noodles recipe with this tested recipe. Step-by-step guide with pro tips for amazing results every time!
hand-pulled noodles recipe
📌 Key Takeaways
- 🍜 Only 4 ingredients needed: All-purpose flour, salt, water, and vegetable oil create restaurant-quality hand-pulled noodles at home
- ⏱️ 2-hour rest is essential: Gluten relaxation transforms tough dough into silky, stretchable strands without tearing
- 🔬 Hydration matters: 60% hydration ratio (1 cup water to 2⅔ cups flour) creates the ideal extensibility
- 💪 Beginner-friendly method: This easy hand-pulled noodles recipe uses long resting and oiling to minimize failures
- 🥢 3 thickness options: Thin, flat, or wide—choose your noodle style based on your sauce pairing
- ⚡ Cook time: Just 1-1.5 minutes in boiling water for perfect al dente texture
🍜 What Are Hand-Pulled Noodles? The Ultimate Comfort Food
Hand-pulled noodles (la mian) are freshly made Chinese noodles created by repeatedly stretching and folding dough until it transforms into springy, satisfying strands with an incredible chewy texture. Unlike machine-made pasta or dried noodles, hand-pulled noodles deliver an unmatched bounce and silky surface that clings perfectly to sauce—making every bite a savory experience.
This hand-pulled noodles recipe easy method is designed specifically for beginners who’ve never attempted this ancient technique. Whether you’ve searched for a hand-pulled noodles recipe Reddit users recommend or a hand-pulled noodles recipe NYT featured, you’ll find that mastering this comfort food requires understanding just a few key principles.
What makes this noodle dish so special? The answer lies in the fresh gluten network you create through proper hydration, resting, and technique. When you toss these freshly pulled noodles into a creamy sauce or savory broth, you’ll understand why hand-pulled noodles have been a beloved staple in Chinese cuisine for over 4,000 years.
Understanding Noodle Styles: A Quick Glossary
Before diving into this recipe, let’s clarify the different hand-pulled noodle techniques:
| Style | Technique | Texture |
|---|---|---|
| La Mian (This Recipe) | Stretched and bounced on table | Springy, chewy, uniform |
| Lanzhou Hand-Pulled Noodles | Pulled into very thin strands | Delicate, silky |
| Biang Biang Noodles | Slammed and stretched wide | Thick, belt-like, chewy |
| Cut Noodles (Dao Xiao Mian) | Shaved from dough block | Irregular, thick edges |
This hand-pulled noodles recipe Chinese style teaches the classic la mian technique—a beginner-safe method with a low failure rate thanks to extended resting and generous oiling.

🔬 The Science Behind Perfect Hand-Pulled Noodles
Understanding the food science behind hand-pulled noodles transforms your success rate from guesswork to guaranteed results. According to Serious Eats’ Food Lab, the key to extensible dough lies in gluten development and relaxation—two opposing forces you must balance perfectly.
Gluten Development: The Protein Network
When flour meets water, two proteins—glutenin and gliadin—combine to form gluten. This protein network gives dough its structure and elasticity. For hand-pulled noodles, you need strong but relaxed gluten:
- Glutenin provides strength and elasticity (the snap-back quality)
- Gliadin provides extensibility (the stretchy quality)
- Balance is key: Too much strength = tearing; too much extensibility = mushy noodles
Why Hydration Percentage Matters
The hydration ratio—water weight divided by flour weight—determines your dough’s behavior:
| Hydration | Result | Best For |
|---|---|---|
| 55-58% | Firm, harder to stretch | Experienced pullers |
| 60-62% (This Recipe) | Balanced, forgiving | Beginners |
| 65%+ | Very soft, sticky | Wet noodle styles |
This recipe uses approximately 60% hydration—the sweet spot for a hand-pulled noodles recipe easy enough for first-timers while still producing authentic results.
The Magic of Resting: Why 2 Hours Transforms Everything
Here’s what happens during the 2-hour rest:
- Gluten relaxation: The protein network loosens, reducing elasticity and increasing extensibility
- Hydration equalization: Water distributes evenly throughout the dough
- Oil penetration: The generous oil coating prevents sticking and further relaxes the gluten surface
- Enzyme activity: Natural enzymes slightly break down gluten bonds
Pro tip: The first 20-minute rest develops gluten; the 2-hour rest relaxes it. Both are essential. Skipping either will result in dough that snaps back or tears when pulled.
Salt’s Role in Dough Strength
Salt does more than add flavor—it tightens the gluten network and increases dough strength by about 20-30%. The ½ teaspoon in this recipe provides:
- Enhanced gluten network stability
- Improved texture in the final noodle
- Slight fermentation inhibition (keeps dough fresh longer)
Some traditional Lanzhou hand-pulled noodles recipe variations use alkaline water (peng hui) instead of or alongside salt, which creates an even more extensible, yellow-tinted noodle. This recipe keeps things simple with just salt.
📝 Ingredients for Hand-Pulled Noodles
One of the beautiful aspects of this hand-pulled noodles recipe is its simplicity—just four pantry staples create restaurant-quality noodles:
Main Ingredients
- 2⅔ cups all-purpose flour (approximately 320g) — provides 10-12% protein for ideal gluten development
- 1 cup water, room temperature (240ml) — room temp hydrates flour more evenly than cold water
- ½ teaspoon salt — strengthens gluten network
- Vegetable oil to coat — any neutral oil works; prevents sticking and aids relaxation
Flour Selection Guide
Your flour choice significantly impacts results:
| Flour Type | Protein Content | Result |
|---|---|---|
| All-Purpose (Recommended) | 10-12% | Balanced, forgiving, chewy |
| Bread Flour | 12-14% | More chewy, harder to stretch |
| High-Gluten Flour | 14%+ | Very chewy, experienced pullers only |
| Cake Flour | 7-9% | Too weak, will tear |
Precise Measurements by Weight
For consistent results, measure by weight. Here’s how to scale:
| Servings | Flour | Water | Salt |
|---|---|---|---|
| 2 servings | 160g | 96g | 1.5g |
| 4-8 servings (This Recipe) | 320g | 192g | 3g |
| 12 servings | 480g | 288g | 4.5g |
Altitude and Humidity Adjustments
- High altitude (5,000+ feet): Increase water by 1-2 tablespoons; flour dries faster at elevation
- High humidity (70%+): Reduce water by 1 tablespoon; flour absorbs moisture from air
- Dry climate: Add water gradually; you may need the full cup plus 1-2 tablespoons
If you love noodle dishes, you’ll also enjoy this Rare Dan Dan Noodles Recipe – 5-Star Family Favorite which pairs perfectly with fresh hand-pulled noodles.
🔧 Equipment Needed
You don’t need specialized equipment—just basic kitchen tools:
Essential Equipment
- Large mixing bowl — for mixing and resting dough
- Chopsticks or spatula — for initial mixing
- Plastic wrap — for covering during rest periods
- Rolling pin — for flattening dough into ovals
- Sharp knife or bench scraper — for cutting dough strips
- Large pot — for boiling noodles (at least 4 quarts)
- Clean work surface — smooth countertop or large cutting board
Helpful But Optional
- Kitchen scale — for precise measurements
- Baking sheet or plate — for holding oiled dough pieces
- Spider strainer or slotted spoon — for removing noodles from boiling water
Accessibility Adaptations
Working with limited space, weak wrists, or involving kids? Here are modifications:
- Limited counter space: Use a large wooden cutting board placed over your stove or sink
- Weak wrists: Make smaller dough portions (divide into 8 pieces instead of 2) for easier handling
- No stand mixer: This recipe requires no mixer—hand kneading takes just 3-4 minutes total
- Kid-friendly approach: Let children help with mixing and oiling; adults handle the pulling
👨🍳 Step-by-Step Hand-Pulled Noodles Instructions
Hand-Pulled Noodles Recipe
Total Time: 2 hours 42 minutesutes
Yield: 4 1x
Description
Freshly made hand pulled noodles that are springy and satisfying, with a chewy texture using only four ingredients.
Ingredients
Scale
2 2/3 cup all-purpose flour
1/2 teaspoon salt
1 cup water, room temperature
Vegetable oil to coat the dough
Instructions
Combine the water and salt in a small bowl. Stir to dissolve the salt.
Add the flour into a large bowl. Bit by bit, pour the water into the flour, mixing with a pair of chopsticks or a spatula as you go.
Once all the water is added, the dough should be in shaggy threads with little/no dry flour in the bowl. Begin pressing the dough together. If you find the dough is too dry and there’s still dry flour that’s hard to incorporate into the dough, drizzle more water onto the dry flour and mix it again, until there’s no dry flour left. Knead the dough until a rough, firm ball is formed, about 2 minutes.
Cover the bowl with plastic wrap and let it rest for 20 minutes.
Once the dough is rested, knead it again until it becomes smooth, 1 to 2 minutes.
Shape the dough: For thin noodles, divide the dough to halves and roll each dough into a 1/2 inch thick oval. For flat noodles, divide the dough to halves and roll each dough into a 1/4 inch thick oval. For wide noodles, cut the dough into 8 pieces and roll each piece into approximately 3×5 inch ovals, 1/4 inch high.
Coat the dough(s) generously with oil and cover with plastic. Let rest for 2 hours.
Bring a medium-sized pot of water to a boil.
For thin noodles: Cut along the longer side of the oval, slicing the dough into 1/2 inch wide strips. Pick up each strip on both ends, tug the noodle about an arm’s length and gently bounce it on the working surface until it forms a long, thin noodle. Fold over and give it a couple light tugs and bounces until the noodles reach the desired thin shape. Pull off the thick ends.
For flat noodles: Cut along the longer side of the oval, slicing the dough into 1 1/2 inch wide strips. Pick up each strip on both ends, tug the noodle to about an arm’s length and gently bounce it on the working surface. Rest the noodle for 10-20 seconds, then give extra-light tugs and bounces until it forms a flat long noodle. Pull off the thick ends.
For wide noodles: Grip the short ends of a strip and pull it apart in one swift motion until the dough feels taut. Bounce it on the table a couple times. Pull off the thick ends.
Drop the noodles, a few pieces at a time, into the boiling water and cook for 1 to 1.5 minutes, until tender but still with a chewy texture. Do not cook too many noodles at a time.
Notes
Recipe tested and perfected for best results. Enjoy!
- Prep Time: 20 minutesutes
- Cook Time: 2 minutesutes
- Category: Main Dishes
- Method: Dessert
- Cuisine: Chinese
Follow these detailed steps for perfect hand-pulled noodles every time. Each step includes visual cues so you know exactly what “ready” looks and feels like.
Step 1: Dissolve Salt in Water
Combine 1 cup room temperature water and ½ teaspoon salt in a small bowl. Stir until completely dissolved—about 30 seconds. You shouldn’t see any salt granules remaining.
Visual cue: Water should be completely clear with no visible salt particles.
Step 2: Mix Flour and Water
Add 2⅔ cups flour to a large bowl. Bit by bit, pour the salt water into the flour while mixing with chopsticks or a spatula.
Technique tip: Pour in a thin stream while constantly stirring to distribute water evenly. This prevents large dry pockets.
Visual cue: After all water is added, dough should form shaggy threads with little to no dry flour remaining in the bowl.
Step 3: Initial Knead (2 Minutes)
Press the shaggy dough together with your hands. If dry flour remains that won’t incorporate, drizzle 1-2 teaspoons more water onto the dry spots and mix again.
Knead by pressing the dough away from you with the heel of your palm, folding it back, rotating 90 degrees, and repeating. Continue for 2 minutes.
Visual cue: Dough should form a rough, firm ball. Surface will look shaggy and uneven—this is normal!
Feel cue: Dough should feel firm and slightly resistant, not sticky or too soft.
Step 4: First Rest (20 Minutes)
Cover the bowl tightly with plastic wrap. Let dough rest at room temperature for 20 minutes.
What’s happening: Gluten strands are forming and water is distributing evenly throughout the dough. This builds the protein network.
Step 5: Second Knead (1-2 Minutes)
Uncover and knead the dough again until it becomes smooth—about 1 to 2 minutes.
Visual cue: Surface should transform from shaggy to smooth and slightly tacky. When you press a finger into the dough, it should slowly spring back.
Feel cue: Dough will feel noticeably more pliable and less resistant than after the first knead.
Step 6: Shape the Dough
Choose your noodle style and shape accordingly:
| Style | How to Divide | Shape & Thickness |
|---|---|---|
| Thin Noodles | Divide dough in half | Roll into ½-inch thick oval |
| Flat Noodles | Divide dough in half | Roll into ¼-inch thick oval |
| Wide Noodles | Cut into 8 pieces | Roll each into 3×5 inch oval, ¼-inch thick |
Step 7: Oil and Long Rest (2 Hours)
Coat each dough piece generously with vegetable oil on all surfaces. Place on a plate or baking sheet, cover tightly with plastic wrap.
Rest for 2 hours at room temperature.
Critical: This is the most important rest. Do not skip or shorten it! The oil prevents surface drying while the extended rest relaxes gluten for easy stretching.
Visual cue after resting: Dough will appear slightly flattened and very smooth. It should feel extremely soft and pliable when pressed.
Step 8: Prepare Boiling Water
About 10 minutes before your rest time ends, bring a large pot of water (at least 4 quarts) to a rolling boil.
Pro tip: Use plenty of water—at least 1 quart per serving of noodles. More water maintains temperature when noodles are added and prevents sticking.
Step 9: Cut Dough Strips
Remove plastic wrap. Using a sharp knife, cut the oiled dough based on your chosen style:
- Thin noodles: Cut along the longer side into ½-inch wide strips
- Flat noodles: Cut along the longer side into 1½-inch wide strips
- Wide noodles: Keep each small piece whole
Step 10: Pull the Noodles
For Thin Noodles:
- Pick up one strip, holding each end between your thumb and fingers
- Gently tug the noodle while bouncing it on the work surface
- Continue stretching to about arm’s length
- Fold the noodle in half and give a few more light tugs and bounces
- Pull or pinch off the thick ends (discard or save for later batch)
For Flat Noodles:
- Pick up one wide strip, holding both ends
- Tug gently to arm’s length while bouncing on the surface
- Rest the noodle for 10-20 seconds (this lets gluten relax mid-pull)
- Give extra-light tugs and bounces until flat and long
- Pull off thick ends
For Wide Noodles:
- Grip the short ends of one small dough piece
- Pull apart in one swift motion until the dough feels taut
- Bounce on the table a couple times to even thickness
- Pull off thick ends
Feel cue: Properly rested dough will stretch smoothly without snapping back. If dough resists or tears, let it rest 15-30 more minutes.
Step 11: Cook the Noodles
Drop noodles into boiling water a few pieces at a time—don’t overcrowd.
Cook for 1 to 1.5 minutes until tender but still chewy.
Doneness test: Pull out one noodle, let it cool 5 seconds, then bite. It should have slight resistance in the center (al dente) but no raw flour taste.
Sauce tip: Before draining, save 1 cup pasta water! This starchy liquid is gold for emulsifying sauces. When combined with fat, it creates a creamy coating that clings to noodles.
Step 12: Serve Immediately
Transfer cooked noodles directly to your prepared sauce or soup. Toss immediately to coat. Fresh hand-pulled noodles are best enjoyed within minutes of cooking!
⚡ Pro Tips & Common Mistakes
Pro Tips from Restaurant Kitchens
- Sauce-to-pasta ratio: Follow the 1:1.5 rule—for every 1 cup of noodles, use 1.5 cups of sauce for perfect coating
- Emulsification technique: Add splash of starchy pasta water to your sauce, then add fat (oil or butter). Toss vigorously—the starch acts as an emulsifier creating a creamy, cohesive sauce
- Finishing in sauce: Transfer noodles to sauce 30 seconds before fully cooked. The 2-minute absorption time allows noodles to soak up flavor
- Work in batches: Pull and cook noodles in small batches for best texture—don’t let pulled noodles sit
- Keep water at rolling boil: Reduce temperature and noodles turn mushy
Troubleshooting Matrix
| Problem | Cause | Fix |
|---|---|---|
| Dough snaps back when pulled | Gluten too tight; insufficient rest | Rest 30+ more minutes; add more oil |
| Dough tears during pulling | Too dry; over-developed gluten | Knead in 1 tsp water; rest longer |
| Uneven thickness | Pulling too fast; uneven dough | Slow, steady pulls; bounce on table |
| Sticky dough | Too much water; insufficient oil | Add more flour; coat with more oil |
| Noodles dissolve in water | Overcooked; water not boiling enough | Cook only 60-90 seconds; maintain rolling boil |
| Chewy texture but not in good way | Under-rested or under-hydrated | Ensure full 2-hour rest; check hydration |
| Mushy texture | Overcooked; too much water in dough | Reduce cook time; reduce water next batch |
Common Mistakes to Avoid
- ❌ Using cold water: Cold water doesn’t hydrate flour evenly—always use room temperature
- ❌ Skipping the 2-hour rest: This is non-negotiable for stretchable dough
- ❌ Skimping on oil: Generous oil coating prevents sticking and aids relaxation
- ❌ Pulling too aggressively: Gentle, steady stretches with bouncing work better than yanking
- ❌ Overcrowding the pot: Cook 2-3 noodles at a time maximum
- ❌ Letting pulled noodles sit: Pull and cook immediately for best texture
🔄 Variations & Sauce Pairings

Choose Your Noodle: A Decision Tree
Your desired texture determines the best hand-pulled method:
- Want silky noodles in soup? → Thin noodles, 60% hydration, full 2-hour rest
- Want chewy noodles for dry dishes? → Flat noodles, 58% hydration, extra bouncing
- Want thick, belt-like noodles? → Wide noodles, 62% hydration, one swift pull
Hand Pulled Noodles Recipe Sauce Pairings
Different noodle thicknesses work best with specific sauces:
| Sauce Style | Best Noodle | Why |
|---|---|---|
| Chili oil (Hong You) | Wide or flat | Surface area catches oil and sediment |
| Cumin lamb | Wide | Thick noodles stand up to hearty meat |
| Dan dan-style | Thin | Creamy sauce coats thin strands evenly |
| Garlic-scallion | Thin or flat | Simple sauce needs delicate noodle |
| Beef broth (Soup) | Thin | Thin noodles absorb broth flavor |
| Hand pulled noodles recipe chicken | Flat | Medium width balances with shredded chicken |
Flour Substitutions
While all-purpose flour is recommended, here are substitution guidelines:
- Bread flour: Reduce water by 1 tablespoon; extend rest to 3 hours
- High-gluten flour: For chewy Lanzhou hand-pulled noodles recipe style; requires experience
- 50/50 AP and bread flour: Good compromise for extra chew without difficulty
Hand Pulled Noodles Soup Recipe Variation
To serve these as soup noodles:
- Pull thin noodles as directed
- Cook 60 seconds only (slightly under al dente)
- Transfer directly to hot broth—noodles finish cooking in soup
- Top with parmesan, scallions, cilantro, or your preferred garnishes
For another incredible noodle dish, try this Special Caramelized Beef And Peanut Noodles Recipe – 100% Foolproof Guide.
📦 Storage & Meal Prep
Make-Ahead Timeline
| Stage | Storage Method | Duration |
|---|---|---|
| After initial knead | Wrap tightly, refrigerate | Up to 24 hours |
| After oiling, before 2-hour rest | Cover, refrigerate overnight | Up to 12 hours |
| After pulling (uncooked) | NOT recommended | Pull and cook immediately |
| Cooked noodles | Toss with oil, refrigerate | 1-2 days (texture decline) |
Freezing Instructions
For dough (best option):
- After initial knead, wrap dough tightly in plastic
- Place in freezer bag, remove air
- Freeze up to 1 month
- Thaw overnight in refrigerator
- Bring to room temperature, knead briefly, then proceed with oiling and resting
For par-cooked noodles:
- Cook noodles for only 30 seconds
- Immediately ice bath to stop cooking
- Drain well, toss with 1 tablespoon oil
- Spread on sheet pan, freeze until solid
- Transfer to freezer bag
- Cook from frozen in boiling water for 2 minutes
Reheating Tips
- From refrigerated: Dip in boiling water for 30 seconds to refresh
- From frozen: Add directly to boiling water; cook 2 minutes
- In soup: Add cold noodles directly to hot broth; simmer 1 minute
- Avoid microwave: Creates uneven texture—boiling water method preserves chew
Food Safety Notes
- Resting dough at room temperature for 2 hours is safe—no eggs in recipe
- Don’t rest longer than 4 hours at room temperature
- Refrigerate dough if resting overnight; bring to room temp before pulling
- Discard any dough that develops off-smell or discoloration
❓ Frequently Asked Questions
Why do my hand-pulled noodles keep snapping?
Snapping occurs when gluten hasn’t relaxed enough. Ensure you complete the full 2-hour oil-coated rest, use room temperature water, and pull gently with bouncing rather than yanking. If dough still snaps, rest another 30 minutes before trying again.
Can I use bread flour instead of all-purpose flour?
Yes, but reduce water by 1 tablespoon and extend the rest time to 3 hours. Bread flour’s higher protein creates stronger gluten that needs more relaxation. The result will be chewier noodles, similar to a Lanzhou hand-pulled noodles recipe style.
How long can I rest the dough before pulling?
At room temperature, 2-4 hours is ideal. Beyond 4 hours, gluten can become over-relaxed and noodles won’t hold shape. For longer delays, refrigerate the oiled dough up to 12 hours, then bring to room temperature for 30 minutes before pulling.
Why are my noodles mushy after cooking?
Mushy noodles result from overcooking or insufficient boiling water. Cook for only 60-90 seconds, maintain a rolling boil, and don’t overcrowd the pot. Use at least 4 quarts of water for this recipe amount.
Can I make hand-pulled noodles ahead of time?
You can prepare dough ahead but should pull and cook immediately before serving. Prepare dough through the oiling step, refrigerate overnight, then bring to room temperature and complete the 2-hour rest before pulling. Don’t let pulled noodles sit—they’ll stick together.
What sauce goes best with hand-pulled noodles?
Classic pairings include chili oil, garlic-scallion sauce, dan dan sauce, and beef broth. For thin noodles, use lighter sauces or soups. For wide noodles, choose chunky meat sauces or bold chili oils that cling to the broad surface.
Is this recipe the same as Woks of Life hand-pulled noodles?
This recipe uses similar traditional techniques to hand-pulled noodles recipe woks of life style—both rely on proper hydration, resting, and oil coating. The core method is authentic la mian technique used across many Chinese noodle recipes.
📚 Learn More About Noodle Science
Want to dive deeper into the food science behind perfect noodles and pasta? These authoritative resources explain the techniques in more detail:
- Serious Eats’ The Food Lab — Comprehensive food science explanations for home cooks
- America’s Test Kitchen — Rigorously tested recipes and techniques

About Chef Lucía Barrenechea Vidal
Chef Lucía Barrenechea Vidal is a culinary expert specializing in global comfort foods and pasta techniques. With over 15 years of experience in professional kitchens and culinary education, she brings authentic techniques and food science principles to home cooks. Her recipes on Frutameal focus on approachable methods that deliver restaurant-quality results.
Specialty: Noodle dishes, pasta dinner recipes, Italian food, and Asian comfort food