Follow Me On Social Media!


Big Honey Lemon Chicken Recipe – 7 Ingredients Only
Make the big honey lemon chicken recipe with this tested recipe. Step-by-step guide with pro tips for amazing results every time!
Honey Lemon Chicken Recipe
*Last updated: February 01, 2026*
📌 Key Takeaways
- 🔥 Ready in 20 minutes – perfect for busy weeknights or last-minute guests
- 🍗 Pan-searing technique – locks in juices and creates golden brown, tender chicken
- 🌶️ Customization – easily adaptable for gluten-free, low-carb, or air fryer versions
- 🥗 Health benefit – high-protein, low-fat, and packed with vitamin C from fresh lemon
- 💡 Convenience factor – minimal prep, one pan, and pantry-friendly ingredients
- 🧪 Science tip – flour coating and Maillard reaction ensure a crispy, flavorful crust
Recipe Overview & Why It Works
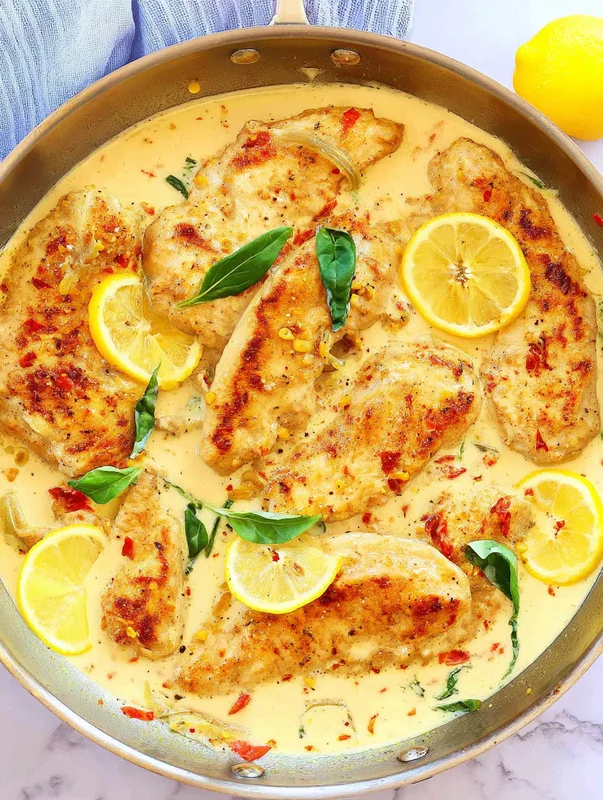
Succulent, golden brown chicken bathed in a zesty, sweet-tart honey lemon sauce—this honey lemon chicken recipe is a weeknight dinner hero. Inspired by both Greek and Asian flavors, it’s a protein-packed main course that’s as easy as it is impressive. Whether you’re searching for “honey lemon chicken recipe easy” or want a dish reminiscent of your favorite takeout, this recipe delivers juicy, tender chicken with a glossy, crave-worthy glaze.
What sets this recipe apart is its balance: the tang of fresh lemon juice, the natural sweetness of honey, and the savory depth of chicken stock. The flour coating ensures a crispy exterior, while a quick pan-sear locks in moisture. Ready in just 20 minutes, it’s ideal for busy families, meal preppers, or anyone craving a restaurant-quality chicken dinner at home.
Unlike many “honey lemon chicken recipe Chinese” or “honey lemon chicken recipe oven” versions, this method uses a single skillet and no deep frying. The result? Less mess, more flavor, and a dish that’s easy to adapt for gluten-free, low-carb, or air fryer needs. Serve it over rice, pasta, or orzo for a complete meal that’s sure to become a staple in your kitchen.
Looking for more inspiration? This recipe draws on food science principles from Serious Eats and America’s Test Kitchen to guarantee perfect results every time.

The Science Behind Perfect Honey Lemon Chicken
Great honey lemon chicken isn’t just about the right ingredients—it’s about understanding the science that makes each bite juicy, flavorful, and perfectly cooked. Here’s how culinary techniques and food chemistry elevate this classic main course:
Maillard Reaction: The Secret to Golden Brown Perfection
When you coat chicken in flour and sear it in a hot pan, you trigger the Maillard reaction—a complex chemical process that creates hundreds of flavor compounds and that irresistible golden brown crust. The flour not only helps the chicken brown evenly but also absorbs surface moisture, ensuring a crisp exterior. According to Serious Eats, this reaction is key to developing deep, savory notes that make each bite memorable.
Carryover Cooking: Pull at 155°F for a Juicy Finish
Chicken continues to cook after it leaves the pan due to residual heat—a phenomenon known as carryover cooking. For perfectly juicy chicken, remove it from the heat when it reaches 155°F; it will rise to the safe 165°F as it rests. This prevents overcooking and keeps the meat tender and moist.
Resting Period Math: 5 Minutes Per Pound
Allowing chicken to rest after cooking lets juices redistribute, resulting in a more succulent bite. The general rule is to rest for 5 minutes per pound. For thin chicken breasts, a 5-minute rest is ideal.
Marinade Penetration: The 1/4 Inch Rule
While marinating can add flavor, science shows that most marinades only penetrate about 1/4 inch into the meat. That’s why seasoning the flour and sauce is crucial for maximum flavor impact.
Skin Crisping: Pat Dry & Baking Powder Trick
For crispy skin (if using skin-on chicken), pat the chicken dry and add a pinch of baking powder to the flour. This raises the pH, enhancing browning and crispiness.
Internal Temperature Zones: Thigh vs. Breast
Chicken breasts are best at 165°F, while thighs can go up to 175°F for optimal tenderness. This recipe uses breasts, but the technique works for both cuts.
Spatchcock Method: 40% Faster Cooking
For whole chicken, spatchcocking (removing the backbone and flattening) reduces cooking time by up to 40% and ensures even doneness.
How to Select the Best Chicken at the Store
Choose fresh chicken with a pink hue, firm texture, and no off-odors. Organic or free-range options often yield better flavor and texture.
For more on the science of cooking poultry, see America’s Test Kitchen.
Ingredients You’ll Need
- 2 large chicken breasts (around 200g/7oz each), sliced in half to make 4 thin chicken breasts
- 3 tbsp plain (all-purpose) flour
- 1/2 tsp salt
- 1/2 tsp black pepper
- 1/2 tsp paprika
- 1 tbsp olive oil
- 2 tbsp unsalted butter
- 2 cloves garlic, minced
- 120 ml (1/2 cup) chicken stock
- 4 tbsp fresh lemon juice (juice from approx. 1.5 lemons)
- 3 tbsp honey
- 1 lemon, sliced into half-moon slices
- 1 tbsp freshly chopped parsley
- Cooked rice, spaghetti/linguine, or orzo (to serve)
Optional for dietary adaptations: Use gluten-free flour for a gluten-free version, or swap honey for a low-carb sweetener for keto diets.

Step-by-Step Instructions
Step 1: Prepare the Chicken
Place the chicken breasts on a tray or board. Mix together 3 tbsp flour, 1/2 tsp salt, 1/2 tsp black pepper, and 1/2 tsp paprika. Coat both sides of the chicken with the flour mixture, pressing gently to adhere.
Place the chicken breasts on a tray or board. Mix together 3 tbsp flour, 1/2 tsp salt, 1/2 tsp black pepper, and 1/2 tsp paprika. Coat both sides of the chicken with the flour mixture, pressing gently to adhere.
Step 2: Sear the Chicken
Heat 1 tbsp olive oil and 2 tbsp unsalted butter in a large frying pan over medium-high heat until the butter melts and foams. Add the chicken and cook for 7-8 minutes, turning once, until both sides are golden brown and cooked through. Remove chicken and set aside.
Heat 1 tbsp olive oil and 2 tbsp unsalted butter in a large frying pan over medium-high heat until the butter melts and foams. Add the chicken and cook for 7-8 minutes, turning once, until both sides are golden brown and cooked through. Remove chicken and set aside.
Step 3: Make the Sauce
Add 2 cloves minced garlic to the pan. Stir for 30 seconds (don’t let the garlic burn). Pour in 120 ml (1/2 cup) chicken stock, 4 tbsp lemon juice, 3 tbsp honey, and lemon slices. Bring to a boil, then simmer for 5 minutes until the sauce is slightly reduced.
Add 2 cloves minced garlic to the pan. Stir for 30 seconds (don’t let the garlic burn). Pour in 120 ml (1/2 cup) chicken stock, 4 tbsp lemon juice, 3 tbsp honey, and lemon slices. Bring to a boil, then simmer for 5 minutes until the sauce is slightly reduced.
Step 4: Finish & Serve
Return the chicken to the pan, spooning sauce over the top. Simmer for 1-2 minutes to heat through. Sprinkle with 1 tbsp chopped parsley. Serve hot over rice, pasta, or orzo.
Return the chicken to the pan, spooning sauce over the top. Simmer for 1-2 minutes to heat through. Sprinkle with 1 tbsp chopped parsley. Serve hot over rice, pasta, or orzo.
Honey Lemon Chicken Recipe
- Total Time: 20 minutesutes
- Yield: 4 1x
Description
Succulent chicken in a fresh and zesty sauce with a hint of sweetness. This honey lemon chicken is ready in 20 minutes.
Ingredients
Scale
2 large chicken breasts (around 200g/7oz each), sliced in half to make 4 thin chicken breasts
3 tbsp plain (all-purpose) flour
1/2 tsp salt
1/2 tsp black pepper
1/2 tsp paprika
1 tbsp olive oil
2 tbsp unsalted butter
2 cloves garlic, minced
120 ml (1/2 cup) chicken stock
4 tbsp fresh lemon juice (juice from approx. 1.5 lemons)
3 tbsp honey
1 lemon, sliced into half-moon slices
1 tbsp freshly chopped parsley
cooked rice, spaghetti/linguine or orzo (to serve)
Instructions
Place the chicken breasts on a tray or board. Mix together the flour, salt, pepper, and paprika. Coat both sides of the chicken with the flour mixture.
Heat the oil and butter in a large frying pan over a medium-high heat, until the butter melts.
Add the chicken to the pan and cook for 7-8 minutes, turning once, until both sides are golden brown.
Add the garlic, stir for 30 seconds (don’t let the garlic burn), then add the chicken stock, lemon juice, honey, and lemon slices.
Bring to the boil and simmer for 5 minutes, until the sauce is slightly reduced.
Sprinkle with fresh parsley and serve with rice or pasta.
Notes
Substitution: For a dairy-free version, use coconut oil or vegan butter in place of regular butter.
- Prep Time: 5 minutesutes
- Cook Time: 15 minutesutes
- Category: Dinner
- Method: Main Course
- Cuisine: American
Pro Tips & Common Mistakes
Pro Tip: For extra crispy chicken, pat the breasts dry before dredging in flour and let them rest for 5 minutes after cooking.
Pro Tip: Use a meat thermometer to check doneness—pull chicken at 155°F and let it rest to reach 165°F.
Pro Tip: Add a pinch of baking powder to the flour for even crispier results.
Pro Tip: For a richer sauce, swirl in an extra tablespoon of butter at the end.
Common Mistake: Overcrowding the pan leads to steaming, not browning. Cook in batches if needed.
Common Mistake: Skipping the rest period—cutting chicken too soon causes juices to run out.
Common Mistake: Using bottled lemon juice—fresh lemon juice gives the best flavor and aroma.
Common Mistake: Burning the garlic—add it after searing chicken and stir quickly to avoid bitterness.

Equipment Needed
| Equipment | Purpose |
|---|---|
| Large frying pan/skillet | For searing and simmering chicken |
| Tongs or spatula | For flipping chicken |
| Mixing bowls | For dredging flour and prepping ingredients |
| Measuring spoons/cups | For accurate ingredient portions |
| Meat thermometer | To check internal temperature |
| Cutting board & knife | For slicing chicken and lemons |
Variations & Substitutions
| Variation | How to Make It |
|---|---|
| Gluten-Free | Use gluten-free all-purpose flour blend |
| Low-Carb/Keto | Swap honey for a keto-friendly sweetener and use almond flour |
| Air Fryer | Cook dredged chicken in air fryer at 400°F for 8-10 minutes per side, then toss in sauce |
| Oven-Baked | Bake dredged chicken at 425°F for 15-18 minutes, then broil for 2 minutes for extra color |
| Asian-Style | Add 1 tbsp soy sauce and 1 tsp grated ginger to the sauce |
| Spicy | Add 1/2 tsp chili flakes or a dash of hot sauce to the sauce |
| Vegetarian | Swap chicken for firm tofu or cauliflower steaks, adjust cooking time |
Storage & Meal Prep
Refrigerator: Store cooled honey lemon chicken in an airtight container for up to 4 days. Reheat gently in a skillet or microwave, adding a splash of water or stock to loosen the sauce.
Freezer: Freeze cooked chicken and sauce in a freezer-safe container for up to 2 months. Thaw overnight in the fridge before reheating.
Meal Prep: Portion chicken and sauce over rice or pasta in meal prep containers. Add steamed veggies for a balanced lunch or dinner. The sauce keeps the chicken moist, making it ideal for make-ahead meals.
Reheating Tips: To prevent drying out, reheat covered at low heat and stir occasionally. Add extra lemon juice or honey to refresh flavors if needed.
Frequently Asked Questions
Can I use chicken thighs instead of breasts?
Yes! Boneless, skinless chicken thighs work beautifully and stay extra juicy. Adjust cooking time as thighs may need a few more minutes to reach 175°F for optimal tenderness.
How do I make this recipe gluten-free?
Simply substitute the all-purpose flour with a gluten-free flour blend. The rest of the ingredients are naturally gluten-free.
Can I prepare honey lemon chicken in advance?
Yes, you can cook the chicken and sauce ahead of time. Store separately or together in the fridge for up to 4 days. Reheat gently before serving.
What sides go well with honey lemon chicken?
Serve with steamed rice, orzo, linguine, roasted vegetables, or a crisp green salad. For wine, try a Sauvignon Blanc or Pinot Grigio.
Can I use bottled lemon juice?
Fresh lemon juice is highly recommended for the best flavor and aroma. Bottled juice can taste flat or bitter.
Is this recipe suitable for meal prep?
Absolutely! The sauce keeps the chicken moist, making it perfect for reheating. Portion with grains and veggies for balanced meals throughout the week.
Learn More

About Chef Lucía Barrenechea Vidal
Chef Lucía brings over 15 years of culinary expertise, blending Mediterranean tradition with modern food science. Her recipes are celebrated for their flavor, simplicity, and reliability. She believes every home cook can create restaurant-quality meals with the right guidance and a dash of creativity.